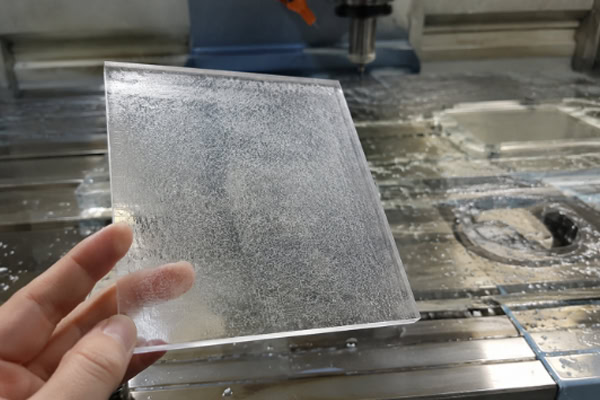
Surface hazing on acrylic after CNC machining is a very common problem in transparent-part manufacturing. The hazed surface looks as though a thin layer of fog has settled on it; light scatters as it passes through, leaving the part looking cloudy rather than clear. Sometimes the haze is visible immediately after machining, and sometimes it only gradually appears over time. The causes of hazing are more than one, and the appropriate fix depends on the cause.
Reasons for fogging
Micro-Surface Damage from Cutting Heat
Acrylic has a glass transition temperature of around 100 C. Above this temperature, the material surface begins to soften. If the frictional heat generated between the cutting edge and the material during CNC machining is not carried away in time by chips or airflow, the localized surface temperature can exceed this threshold. When the softened material cools, a micro-damaged layer with non-uniform refractive index forms on the surface, which is what the eye perceives as haze. The depth of this thermal damage typically ranges from a few microns to a few tens of microns. If it is only a few microns deep, polishing can remove it. If it reaches tens of microns, multi-stage sanding from coarse to fine will be needed.
Tool Condition and Parameter Issues
A dull tool does not cut the material—it rubs against it. Frictional heat generation rises sharply, and hazing becomes almost unavoidable. Excessive spindle speed and overly slow feed rates both aggravate the problem: high speed means more frequent friction cycles, and slow feed means the tool dwells longer over the same area. Additionally, an excessive depth of cut can cause poor chip evacuation; chips that accumulate in the cutting zone are repeatedly recut, generating extra heat and mechanical damage.
Material-Related Factors
Extruded acrylic sheet has higher internal stress than cast acrylic sheet and is more prone to hazing and micro-cracking under the same machining conditions. Cast acrylic has a higher molecular weight and lower internal stress, and typically exhibits milder hazing after machining. When high clarity is a requirement, choosing cast sheet upfront is more cost-effective than labor-intensive remedial work later. Sheets that have been stored for extended periods or exposed to moisture may already have a subtle aged surface layer; once machining adds a new damaged layer on top of this existing one, the combined effect makes the haze more pronounced.
Mechanical Polishing
Progressive Wet Sanding
If the haze is relatively deep or accompanied by visible tool marks, mechanical sanding is the most reliable approach. Wet-sand progressively from coarse to fine grits. A commonly used grit progression is: 400 to 600 to 800 to 1200 to 1500 to 2000. Each grit stage must completely remove the scratch pattern left by the previous grit before moving on. Skipping grades will prevent a quality final result. Wet sanding is preferable to dry sanding—water carries away sanding debris, lowers friction temperatures, and prevents loose abrasive particles from scratching the surface that has just been worked. When sanding, the paper should be backed by a flat, soft sanding block (such as a rubber sanding pad or EVA foam pad), with even pressure applied. Sanding with the paper held directly between the fingers concentrates pressure at the fingertips, resulting in an uneven surface that after polishing may show a patchy mix of glossy and hazy areas.
Polishing Compound and Buffing
After sanding to 2000 grit, the surface is very fine but not yet mirror-like. The next step is to use a polishing compound with a cloth or wool buffing wheel. Common acrylic polishing compounds include cerium-oxide-based and aluminum-oxide-based pastes and liquids. Apply the compound evenly to the surface and work it gently with a low-speed drill or rotary tool fitted with a soft cloth wheel at approximately 1000 to 1500 RPM until a mirror gloss appears.
Points to watch during buffing: wheel speed must not be too high, or localized frictional heat may burn the surface hazy again; do not let coarse compound residue from a previous step remain on the wheel—different grit compounds require separate dedicated wheels; after buffing, clean residual compound from the surface using water or isopropyl alcohol, never wipe dry, as dry-wiping can scratch a freshly polished mirror finish.
Flame Polishing
When It Works and What It Requires
Flame polishing is suitable for acrylic surfaces where the haze is light and there are no pronounced tool marks. If the haze depth is very shallow—within a few microns—a quick flame pass can melt and level the surface layer, restoring clarity upon cooling. If the hazed layer is deeper, however, or if visible tool marks are present, flame polishing alone will not be enough: the molten layer cannot fill deep grooves, and the marks will remain, merely encased beneath a transparent skin. Flame polishing requires the part surface to be clean and dry, free of chips, oil, and fingerprints. Any residue will carbonize under the flame’s high temperature and become permanently embedded in the surface as black specks or yellow stains.
Operating Parameters
An oxyhydrogen generator is the recommended heat source, as its only combustion product is water vapor, which deposits no soot on the surface. Keep the flame roughly 40 to 80 mm from the surface and move it at 40 to 80 mm per second, maintaining a constant speed. Even a momentary pause at any spot will cause over-burning and bubbling. Aim to lightly melt the surface on each pass, allow to cool, then repeat. Two to three light passes typically produce a better result than a single heavy pass. Allow 1 to 2 minutes between passes for the part to cool naturally. It is worth noting that cast acrylic responds to flame polishing significantly better than extruded acrylic. Extruded sheet has higher internal stress and is more likely to develop micro-cracks under heat, which show up as whitening at the crack sites upon cooling. If the sheet type—cast or extruded—is unknown, always test on an offcut first.
Chemical Treatment
Chemical polishing uses solvent vapor or liquid to lightly dissolve the acrylic surface, allowing it to level out and eliminate the hazed layer. A method commonly used in laboratory and small-batch settings is solvent-vapor polishing: the acrylic part is suspended above a small quantity of dichloromethane or chloroform in a sealed container. Solvent vapor condenses on the part surface, dissolves the outermost layer of material, and the surface levels under surface tension before the solvent evaporates, leaving a smooth finish. The advantages of this approach are speed—no progressive sanding is required—and the ability to treat internal surfaces of complex shapes.
Chemical polishing does, however, carry several important cautions: solvent vapors are toxic and the process must be conducted in a well-ventilated environment; excessive immersion time or vapor concentration can over-dissolve the surface, producing sag marks; and chemical polishing releases some of the internal stress within the acrylic, which means the part may undergo slow deformation or develop delayed micro-cracks after treatment. Chemical polishing is generally not recommended for ordinary workshop environments. Where it is needed, it is best sent to a professional surface-finishing operation.
Reduce fogging at the source of processing
Optimizing Cutting Parameters
Rather than laboring to remove haze after machining, it is more efficient to control the conditions that cause it during machining.
Directions for adjustment: use sharp new tooling and inspect or replace tools regularly—a dull tool is the single most common cause of acrylic hazing; keep spindle speed within the recommended surface-speed range (100 to 250 m/min) and resist the urge to simply run at maximum RPM; coordinate feed rate with spindle speed to maintain a feed per tooth of 0.05 to 0.12 mm, so the tool is cutting rather than rubbing; limit the depth of cut per pass to 10 to 30 percent of the tool diameter so that chips have space to evacuate and carry away heat; and, where possible, direct compressed air at the cutting zone—the airflow clears chips while simultaneously providing cooling.
Material Selection and Pre-Treatment
For transparent parts with demanding appearance requirements, choose cast acrylic sheet over extruded. Cast sheet costs more than extruded, but the difference is more than offset by improved machining stability and downstream finishing results. Before machining, check whether the sheet surface already has fine scratches or an aged layer: wipe a small area with a fingertip moistened with isopropyl alcohol. If the wiped spot appears noticeably clearer than the surrounding area, an aged or contaminated surface layer is present. In such cases, lightly sand the surface with fine paper before machining to expose fresh material.
Frequently Asked Questions
Can a hazed acrylic part be restored to full clarity?
It depends on the severity of the haze. If the haze is shallow thermal damage just a few microns deep, mechanical polishing or flame polishing can restore clarity close to that of the original material. If the hazed layer is deeper or is already accompanied by internal micro-cracks, polishing can improve the appearance but may not return the part to factory-level light transmission. For production parts where every piece requires deep polishing to meet requirements, the better approach is to revisit the machining parameters first rather than repeatedly compensating in downstream processing.
Is toothpaste effective for polishing acrylic?
The abrasive particles in toothpaste can be used to polish acrylic, but the effect is limited. The abrasive grain size in ordinary toothpaste is insufficient to deal with the hazed layer left by CNC machining; toothpaste is only suitable for fine surface scratches or as a complement during the final mirror-polishing step. If the hazed layer is deeper, progressive wet sanding from 400 or 600 grit is still required. Toothpaste can substitute for the final fine polishing compound, but it cannot replace the entire sanding and polishing workflow.
Are the treatment methods the same for clear and colored acrylic?
The basic methods are the same, but colored acrylic requires extra caution with flame polishing. Colored materials have different infrared absorption characteristics compared to clear material; they heat up faster at the same flame distance and are more easily over-burned. After polishing, the surface color of colored acrylic may appear slightly lighter than the original material, because removal or melt-resolidification of the surface layer can subtly alter the distribution of the color masterbatch. It is advisable to test on an offcut first to confirm that any color shift is within an acceptable range before proceeding with the actual part.
Conclusion
For dealing with surface hazing on acrylic after CNC machining, the approaches in order from lightest to most intensive are flame polishing, mechanical polishing, and chemical polishing. Flame polishing is quick but technique-sensitive and works best for shallow haze. Mechanical polishing is the most reliable, suitable for the majority of situations, but takes time. Chemical polishing is efficient but carries health and environmental risks, making it unsuitable for ordinary workshop use. Whichever method is chosen, first establish the cause and depth of the haze: try lightly sanding a small area with 2000-grit paper. If the area clears noticeably after a few strokes, the hazed layer is shallow and flame polishing should suffice. If more than a dozen strokes produce little improvement, start mechanical sanding from a coarser grit. Ultimately, preventing haze at the source is more effective than any amount of after-the-fact treatment—replacing one dull tool, lowering the spindle speed by a notch, or adding a compressed-air line may save more effort than fixing ten hazed parts.