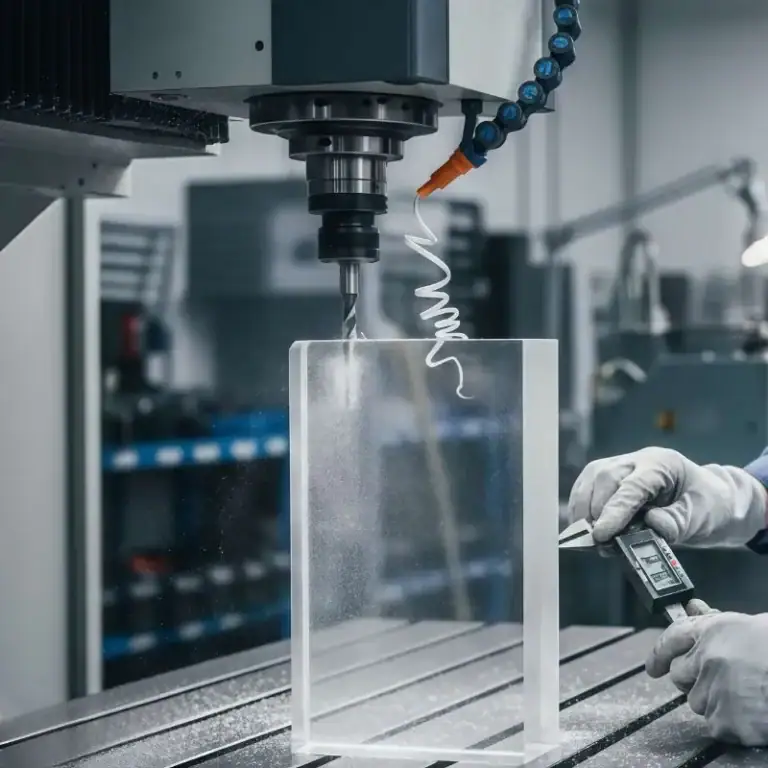
Up milling and down milling are two fundamental CNC milling methods defined by cutter rotation and feed direction. Understanding what is up milling and down milling helps engineers choose the right strategy for material type, machine rigidity, surface finish, and tool life. This guide explains key differences, applications, and selection tips.
In this guide, we clearly explain the differences between up milling and down milling, how each method works, where they are commonly used, and how to select the right approach for real-world CNC machining applications.
What Is Up Milling?
Up milling, also known as conventional milling, is one of the most traditional milling methods in machining. Understanding how chip formation, cutting forces, and tool engagement work in up milling helps engineers choose the right strategy for roughing and legacy machine setups.
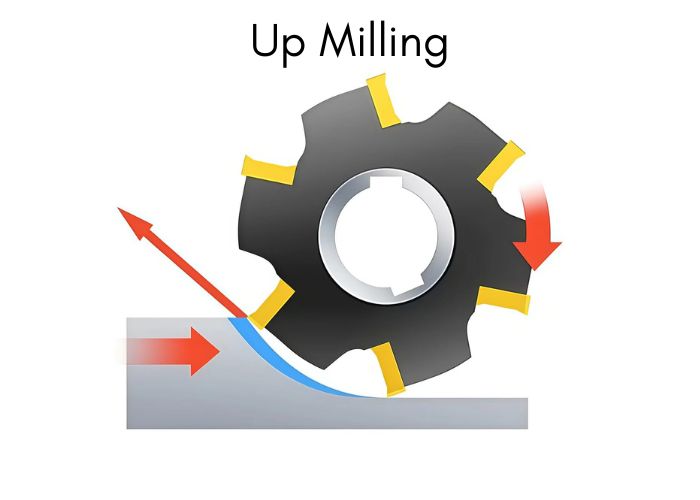
Up milling is a milling process where the cutting tool rotates in the opposite direction to the workpiece feed. At the point of contact, the cutter initially rubs against the surface before fully engaging the material. Chip thickness starts at zero and gradually increases to its maximum at the exit point of the cut.
From a mechanical perspective, this cutting behavior results in higher friction and cutting forces. In practice, I’ve observed that up milling tends to generate more heat and accelerates tool wear, especially when machining harder metals. However, it also offers better control on machines with backlash or limited rigidity, which is why it remains useful for older CNC machines, manual mills, and certain roughing operations.
What Is Down Milling?
Down milling, also known as climb milling, is the preferred milling method in modern CNC machining. By aligning tool rotation with feed direction, it delivers better surface finish, lower cutting forces, and longer tool life—especially in precision applications.
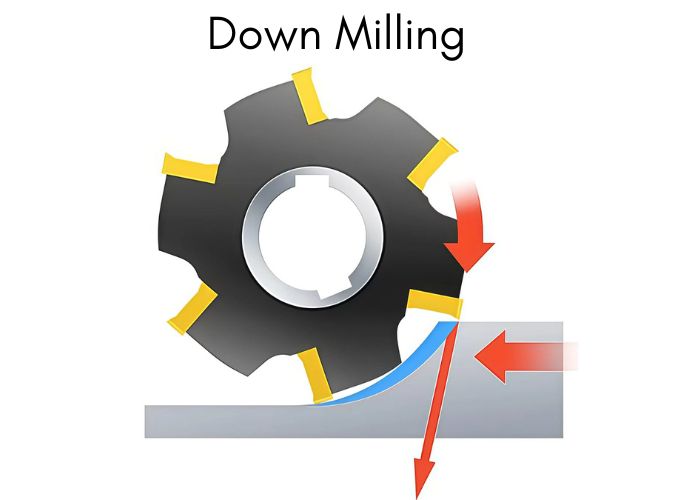
Down milling is a milling process where the cutter rotates in the same direction as the workpiece feed. At the point of engagement, the cutting edge immediately enters the material at maximum chip thickness, which then gradually decreases as the tool exits the cut.
From a machining mechanics perspective, this cutting behavior produces smoother and more stable cutting forces. In real production, I’ve found that down milling significantly reduces vibration and tool wear, especially when machining aluminum alloys and stainless steel. Efficient chip evacuation also prevents chips from being re-cut, which directly improves surface quality and dimensional consistency.
However, down milling requires sufficient machine rigidity and minimal backlash. On modern CNC machines with ball screws and rigid fixturing, it is the go-to choice for finishing operations and high-precision parts, commonly achieving surface roughness as low as Ra1.6µm or better.
Key Differences Between Up Milling and Down Milling
Understanding the key differences between up milling and down milling is critical for selecting the right machining strategy, as each method affects cutting forces, surface finish, tool life, and overall machining efficiency.
| Comparison Aspect | Up Milling (Conventional Milling) | Down Milling (Climb Milling) |
| Cutter Rotation vs Feed Direction | Cutter rotates opposite to the feed direction | Cutter rotates in the same direction as feed |
| Chip Thickness Formation | Chip thickness increases from 0 to maximum | Chip thickness decreases from maximum to 0 |
| Initial Tool Engagement | Tool rubs before cutting, higher friction | Tool cuts immediately, smoother engagement |
| Cutting Forces | Higher cutting forces, force tends to lift workpiece | Lower and more stable forces, presses workpiece down |
| Workpiece Stability | Requires stronger clamping to prevent lifting | Better stability due to downward force |
| Surface Finish Quality | Rougher surface, not ideal for finishing | Smoother surface, suitable for finishing |
| Tool Wear | Higher wear due to friction and heat | Lower wear, longer tool life |
| Heat Generation | Higher heat, more work hardening | Better heat control, minimal work hardening |
| Chip Removal | Less efficient, chips may re-cut surface | Efficient chip evacuation |
| Power Consumption | Higher power usage | 5–15% lower power under same conditions |
| Machine Rigidity Requirement | Suitable for older or less rigid machines | Requires rigid machines with low backlash |
| Typical Applications | Roughing, castings, forgings | Finishing, thin-wall parts, precision machining |
Advantages and Limitations of Up Milling
Up milling, also known as conventional milling, is still widely used in CNC machining when machine rigidity, material behavior, or cutting stability are key concerns. Understanding its advantages and limitations helps engineers choose the right strategy for roughing and hard-material applications.
Advantages of Up Milling
Up milling engages the cutter gradually, with chip thickness increasing from zero to maximum. This cutting mechanism reduces the risk of sudden tool impact, making it suitable for brittle or hard materials such as cast iron and ceramics. In my experience, this gradual engagement lowers tool chipping risk by up to 20–30% in unstable setups.
The cutting forces act opposite to the feed direction, improving leadscrew engagement and reducing backlash issues. As a result, up milling performs reliably on older or less rigid machines and is often preferred for shallow cuts and roughing operations.
Limitations of Up Milling
The main drawback of up milling is higher cutting force and friction. Because the cutter rubs the surface before full engagement, heat generation increases and accelerates tool wear. Surface roughness is typically worse than down milling, often exceeding Ra3.2µm under similar conditions.
Additionally, the upward cutting force can lift the workpiece, requiring stronger fixturing. Poor chip evacuation may also lead to recutting, further reducing tool life and dimensional accuracy.
Advantages and Limitations of Down Milling
Down milling, also known as climb milling, is the preferred choice in modern CNC machining due to its efficiency, surface quality, and reduced tool wear. However, its performance strongly depends on machine rigidity and setup quality.
Advantages of Down Milling
In down milling, the cutter engages the workpiece at maximum chip thickness and gradually exits the cut. This cutting mechanism allows the tool to shear material immediately rather than rub the surface first. In practice, I’ve found this can reduce cutting forces by approximately 5–15% compared to up milling under the same conditions.
Because the cutting force is directed downward, the workpiece is pressed firmly against the table, improving stability and dimensional consistency. Down milling also delivers superior surface finish, often achieving Ra1.6–3.2µm without secondary finishing. Tool wear is more uniform, extending tool life and improving predictability in batch production.
With efficient chip evacuation and lower heat generation, down milling is widely used for finishing operations, thin-walled parts, and high-precision CNC components.
Limitations of Down Milling
The primary limitation of down milling is its sensitivity to machine backlash and rigidity. On machines without backlash compensation, the cutter may pull the workpiece into the cut, causing vibration, dimensional errors, or even tool breakage.
Down milling also requires secure fixturing and stable setups. In my experience, poor clamping or insufficient machine stiffness can negate its advantages entirely. For older machines or rough cast surfaces, down milling may increase risk rather than improve results.
Typical Applications of Up Milling
Up milling, also known as conventional milling, is still widely used in specific machining scenarios where material behavior, machine rigidity, or process stability outweigh surface finish requirements. Understanding its typical applications helps avoid tool damage and machining risk.
From my experience, up milling is most suitable for roughing operations and initial material removal, especially when the goal is controlled engagement rather than surface quality. Because the cutter enters the workpiece gradually—from zero chip thickness to maximum—it reduces sudden impact loads, making it safer for unstable cutting conditions.
Up milling performs well when machining hard or brittle materials such as high-carbon steel, cast iron, and certain hard alloys. The progressive cutting action lowers the risk of edge chipping and tool fracture, which is critical when material hardness is inconsistent or unpredictable.
It is also effective for materials with variable hardness, such as castings, forgings, or parts with surface scale. In these cases, gradual engagement helps stabilize cutting forces and reduces vibration.
Another common application is machining on older or low-rigidity machines. Since the horizontal cutting force acts opposite to the feed direction, backlash effects are minimized, making up milling more forgiving on machines without advanced compensation systems.
However, because the vertical force tends to lift the workpiece, strong fixturing is essential. In practice, I always recommend up milling only when clamping strength and machine stability are well controlled.
Typical Applications of Down Milling
Down milling, also known as climb milling, is the preferred method in modern CNC machining when surface quality, dimensional accuracy, and tool life are critical. Its cutting mechanics make it especially effective for precision and finishing operations.
From my experience, down milling is most commonly used in finishing and precision machining. Because the cutter engages the material at maximum chip thickness and gradually exits the cut, cutting forces remain stable and predictable. This results in smoother surfaces, often achieving Ra 1.6–3.2μm without secondary finishing.
Down milling is highly effective for light to medium cuts, especially when machining intricate features, thin walls, or fine details. The reduced rubbing effect minimizes heat generation and preserves dimensional accuracy, which is essential for tight-tolerance parts in aerospace and automotive applications.
It is also widely used in high-volume production. The consistent chip formation and lower tool wear typically extend cutter life by 20–40% compared to up milling, improving cost efficiency in serial manufacturing such as medical devices and aluminum housings.
Down milling performs best on ductile and uniform materials like aluminum alloys, mild steel, plastics, and copper. These materials benefit from smooth chip evacuation and reduced work hardening.
Another important application is machining thin, flat, or difficult-to-clamp workpieces. The downward vertical cutting force presses the part against the table, improving stability and reducing vibration. On modern CNC machines with high rigidity and minimal backlash, down milling is usually my first choice for final passes.
How to Choose Between Up Milling and Down Milling
Choosing between up milling and down milling is a technical decision that directly affects tool life, surface finish, machine safety, and total machining cost. The right choice depends on material behavior, machine rigidity, and whether the operation is roughing or finishing.
From my experience, the first factor I evaluate is material type. Up milling is safer for hard, brittle, or surface-hardened materials such as castings and forgings. Because the cutter engages gradually, it reduces impact forces and protects the cutting edge. Down milling performs better on ductile materials like aluminum, mild steel, plastics, and nylon, where smooth chip flow and stable cutting are achievable.
Surface finish requirements are equally important. Down milling consistently delivers better surface quality because chip thickness decreases during cutting, minimizing rubbing and heat. It is my default choice for finishing operations. Up milling, by contrast, is more suitable for roughing, where surface quality is secondary.
Machine condition and rigidity often determine the final decision. On older machines or machines without backlash elimination, I prefer up milling because cutting forces oppose table feed and reduce the risk of sudden tool pull-in. Down milling requires rigid CNC machines with minimal backlash to avoid vibration or tool breakage.
Tooling and cutting strategy also matter. For ceramic inserts or heat-resistant alloys, up milling is safer due to lower impact at entry. However, for solid carbide tools and thin-wall parts, down milling reduces deformation and power consumption—sometimes by 5–15%.
In practice, I often use up milling for roughing and down milling for finishing within the same part to balance safety, efficiency, and accuracy.
FAQs
Up Milling And Down Milling Which Is Btter?
From my experience, neither method is universally “better”—the choice depends on application. Down milling is generally superior for finishing and precision work, delivering smoother surfaces and 5–15% lower power consumption under similar conditions. It also reduces tool wear and improves chip evacuation on modern rigid CNC machines. Up milling, however, is safer for roughing, hard or brittle materials, and older machines without backlash control. I select based on material, surface finish, and machine rigidity.
What Is Another Name For Up Milling?
Up milling is also known as conventional milling. In my practice, this term is commonly used in textbooks and legacy machining environments. Conventional milling describes the cutter rotating opposite to the feed direction, with chip thickness increasing from zero to maximum. This gradual engagement reduces entry shock, which is why conventional (up) milling is often preferred for castings, forgings, or surface-hardened materials where tool protection is critical.
What Is Meant By Up Milling And Down Milling?
Up milling and down milling describe two milling strategies based on the relationship between cutter rotation and feed direction. In up milling, the cutter rotates against the feed, producing increasing chip thickness and higher friction. In down milling, the cutter rotates with the feed, starting at maximum chip thickness and decreasing. In my experience, this distinction directly affects surface finish, cutting force direction, heat generation, and tool life.
What Is Upcut Milling?
Upcut milling refers to up milling, where the cutter rotates opposite to the workpiece feed direction. I use this method when machining hard, brittle, or surface-hardened materials because the cutter engages gradually, reducing impact stress. However, upcut milling generates higher friction and heat, often resulting in rougher surfaces and increased tool wear. It typically requires stronger clamping because vertical forces tend to lift the workpiece during cutting.
What Are The Two Types Of Milling?
The two primary types of milling are up milling (conventional milling) and down milling (climb milling). From my experience, these two strategies cover most CNC milling decisions. Up milling is favored for roughing, unstable setups, and older machines, while down milling excels in finishing, high-precision work, and modern CNC environments. Choosing correctly can improve tool life by 20–40% and significantly enhance surface quality.
Conclusion
Up milling and down milling differ in cutter direction, chip formation, and cutting forces.Up milling is safer for roughing, hard materials, and less rigid machines, while down milling delivers better surface finish, longer tool life, and higher efficiency on modern CNC machines. In practice, roughing with up milling and finishing with down milling often gives the best results.
At TiRapid, we optimize up milling for stable roughing and down milling for high-finish accuracy. With proven CNC strategies, strict QC, and fast turnaround, we help engineers cut risk and cost. Upload your drawings to start.